こんにちは,修士2年の平尾真斗です!この記事は,「2.Kubernetes上のPodでGPUを使えるようにした話(ソフトウェア編→Ubuntu上)」の続きです.読んでいない人はぜひ読んでみてくださいね!Kubernetes上のPodをGPUを使えるようにするためのKubernetes上での設定を行ったのでまとめます.ブログの構成はハードウェア編,ソフトウェア編→Ubuntu上,ソフトウェア編→Kubernetes上の3つに分けて書きます.この記事はソフトウェア編→Kubernetes上です.
記事一覧⇩
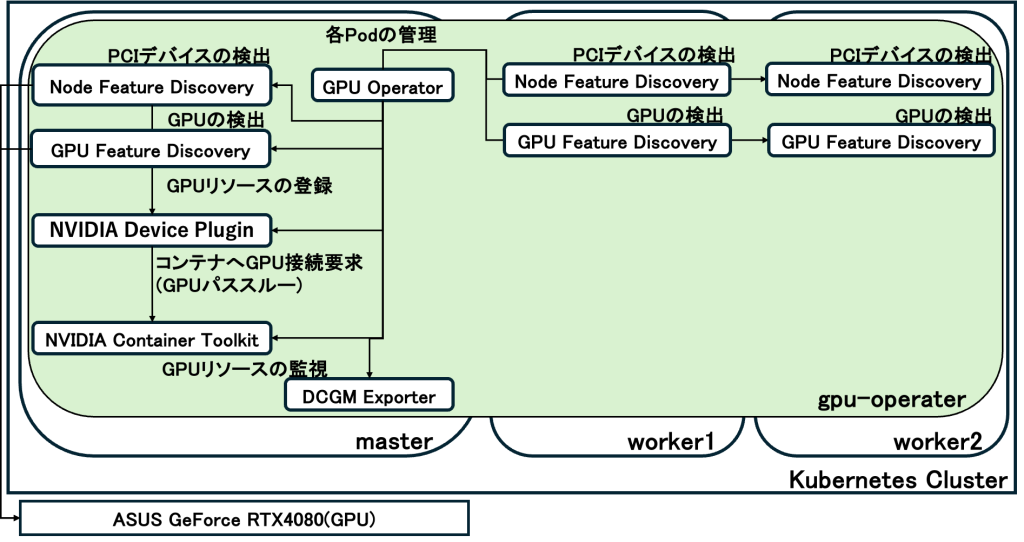
GPUをPodで使用できるようにするための方法にGPU Operatorがあります.インストールするためには,Helmを用います.実際にHelmでインストールした際の構成は以下になります.これもいろいろコンポーネントがあるので説明していきますね.
基盤と管理系
- GPU Operator (gpu-operator-…)
- クラスター全体の管理を行います.各ノードの状態を監視し,必要に応じてドライバーや各種Pod(Device Plugin)を自動でデプロイする役割
- NVIDIA Operator Validator
- 各コンポーネントが正しくインストールされ,GPUがコンテナから利用可能な状態になっているかを最終確認
GPUの検出
- Node Feature Discovery (NFD)
- CPUの機能やPCIデバイスを検出し,ノードにラベル(例:
feature.node.kubernetes.io/pci-10de...)を付与
- CPUの機能やPCIデバイスを検出し,ノードにラベル(例:
- GPU Feature Discovery (GFD)
- NFDと連携し,より詳細なGPU情報(型番:RTX 4080,メモリ容量,CUDAバージョン)を検出し,ノードのラベルとして登録
リソースの割り当てと実行
- NVIDIA Device Plugin
- Kubernetesのスケジューラーに対してノードがGPUで使用可能かどうかを判断する.Podが
resources: limits: nvidia.com/gpu: 1と要求した際,このプラグインが仲介してGPUを割り当てる.
- Kubernetesのスケジューラーに対してノードがGPUで使用可能かどうかを判断する.Podが
- NVIDIA Container Toolkit
- Dockerやcontainerdのランタイムが,コンテナ内部から物理GPUにアクセス(パススルー)できるように,必要なライブラリやパスの設定を行う.
監視エージェント
- DCGM Exporter (Data Center GPU Manager)
- GPUの使用率,温度,電力消費,メモリ使用量のメトリクスを収集
- GPUの使用率,温度,電力消費,メモリ使用量のメトリクスを収集
HelmでのGPU Operatorのインストール
これらのソフトウェアはHelmでインストールします.
hirao@rtx4080-control:~$ helm install gpu-operator -n gpu-operator --create-namespace \
  nvidia/gpu-operator \
  --set driver.enabled=false \
  --set toolkit.nodeSelector.gpu=true \
  --set devicePlugin.nodeSelector.gpu=true \
  --set gpuFeatureDiscovery.nodeSelector.gpu=true \
  --set dcgmExporter.nodeSelector.gpu=true \
  --set toolkit.env[0].name=CONTAINERD_CONFIG \
  --set toolkit.env[0].value=/var/lib/rancher/k3s/agent/etc/containerd/config.toml \
  --set toolkit.env[1].name=CONTAINERD_SOCKET \
  --set toolkit.env[1].value=/run/k3s/containerd/containerd.sock \
  --set toolkit.env[2].name=CONTAINERD_RUNTIME_CLASS \
  --set toolkit.env[2].value=nvidia \
  --set toolkit.env[3].name=CONTAINERD_SET_AS_DEFAULT \
  --set-string toolkit.env[3].value=true
I0220 08:50:26.226941    2783 warnings.go:107] "Warning: spec.template.spec.affinity.nodeAffinity.preferredDuringSchedulingIgnoredDuringExecution[0].preference.matchExpressions[0].key: node-role.kubernetes.io/master is use \"node-role.kubernetes.io/control-plane\" instead"
NAME: gpu-operator
LAST DEPLOYED: Fri Feb 20 08:50:25 2026
NAMESPACE: gpu-operator
STATUS: deployed
REVISION: 1
DESCRIPTION: Install complete
TEST SUITE: None
hirao@rtx4080-control:~$
Helmでインストールする際には,オプションを–setで指定して設定します.私が使用したKubernetesはK3sを使用していたのでオプションに –set toolkit.env[0].value=/var/lib/rancher/k3s/agent/etc/containerd/config.tomlや–set toolkit.env[1].value=/run/k3s/containerd/containerd.sockを入れています.使用するKubernetesのソフトウェアによっても変わるので合わせて使います.
kubectl get podで確認した際に以下のように全てのPodがRunnigになっていればOKです.
hirao@rtx4080-control:~$ kubectl get pods -n gpu-operator
NAME                                                          READY   STATUS      RESTARTS   AGE
gpu-feature-discovery-v2wpk                                   1/1     Running     0          9m58s
gpu-operator-7569f8b499-9sskc                                 1/1     Running     0          10m
gpu-operator-node-feature-discovery-gc-55ffc49ccc-b4fv7       1/1     Running     0          10m
gpu-operator-node-feature-discovery-master-6b5787f695-n5n5f   1/1     Running     0          10m
gpu-operator-node-feature-discovery-worker-2tq48              1/1     Running     0          10m
gpu-operator-node-feature-discovery-worker-4kdf8              1/1     Running     0          10m
gpu-operator-node-feature-discovery-worker-pgzdw              1/1     Running     0          10m
nvidia-container-toolkit-daemonset-7ws8f                      1/1     Running     0          9m59s
nvidia-cuda-validator-fjplx                                   0/1     Completed   0          9m29s
nvidia-dcgm-exporter-f4vbm                                    1/1     Running     0          9m58s
nvidia-device-plugin-daemonset-rmfdz                          1/1     Running     0          9m58s
nvidia-operator-validator-pdv46                               1/1     Running     0          9m58s
hirao@rtx4080-control:~$
探してみるとGPUを使えるか確認するサンプルコードもあるので実践してみます.
apiVersion: v1
kind: Pod
metadata:
  name: cuda-vectoradd
spec:
  restartPolicy: OnFailure
  containers:
  - name: cuda-vectoradd
    image: "nvcr.io/nvidia/k8s/cuda-sample:vectoradd-cuda11.7.1-ubuntu20.04"
    resources:
      limits:
        nvidia.com/gpu: 1
kubectl applyコマンドを入力して確認した際にRunningになってからCompletedになれば動いていることになります.
hirao@rtx4080-control:~/gputest$ kubectl get pods -w
NAME             READY   STATUS              RESTARTS   AGE
cuda-vectoradd   0/1     ContainerCreating   0          6s
cuda-vectoradd   1/1     Running             0          8s
cuda-vectoradd   0/1     Completed           0          9s
cuda-vectoradd   0/1     Completed           0          10s
^Chirao@rtx4080-control:~/gputest$
ステータスがCompleatedになったらkubectl logsで結果の確認を行います.
「Vector addition of 50000 elements」とあるので50000個の配列の足し算をしています.
「CUDA kernel launch with 196 blocks of 256 threads」は並列計算中だということを表しています.
「Copy output data from the CUDA device to the host memory」とあるので最後に結果をGPUからCPUに戻しています.
「Test PASSED」の後に「Done」と出ていればOKです!これでGPUを動かすことができました!
hirao@rtx4080-control:~/gputest$ kubectl logs pod/cuda-vectoradd
[Vector addition of 50000 elements]
Copy input data from the host memory to the CUDA device
CUDA kernel launch with 196 blocks of 256 threads
Copy output data from the CUDA device to the host memory
Test PASSED
Done
hirao@rtx4080-control:~/gputest$
最後に
GPUを使ったサーバをハードウェアの組み立てからソフトウェアのインストールまで全てやってみました.感想としては,大変だったけど,いい経験ができたなって感じです.自分は3月からクラウドプロバイダーで勤務するのでその時に役に立てばいいなと思ってます!